
手順を教えてください。
AWS経験5年以上の僕が、EC2 (Amazon Linux 2) にWordPressをインストールする手順を分かりやすく紹介します。
本記事では基本的にWordPressのインストール完了までを目的にしています。
インストール後、EC2でWordPressを運用するためにはいくつか追加考慮が必要ですが、詳細はふれません。
また、以前はphp7.4を使用したWordPressインストール手順を紹介していましたが、
php7.4は2022/11/3にサポートが終了しているので、php8.2を使用する手順に修正しました。
本記事の内容
- EC2 (Amazon Linux 2) へのWordPressインストール手順
- WebサーバーはNginx、DBサーバーはMariaDBを採用
もくじ
EC2のWordPress構築イメージ:はじめに
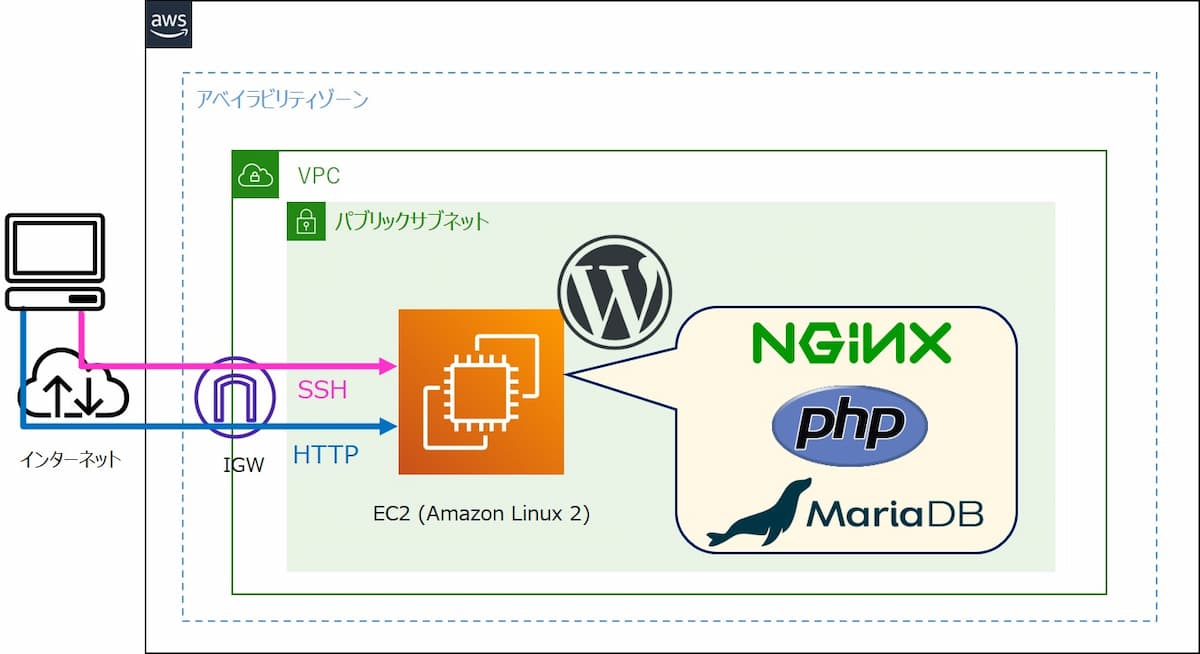
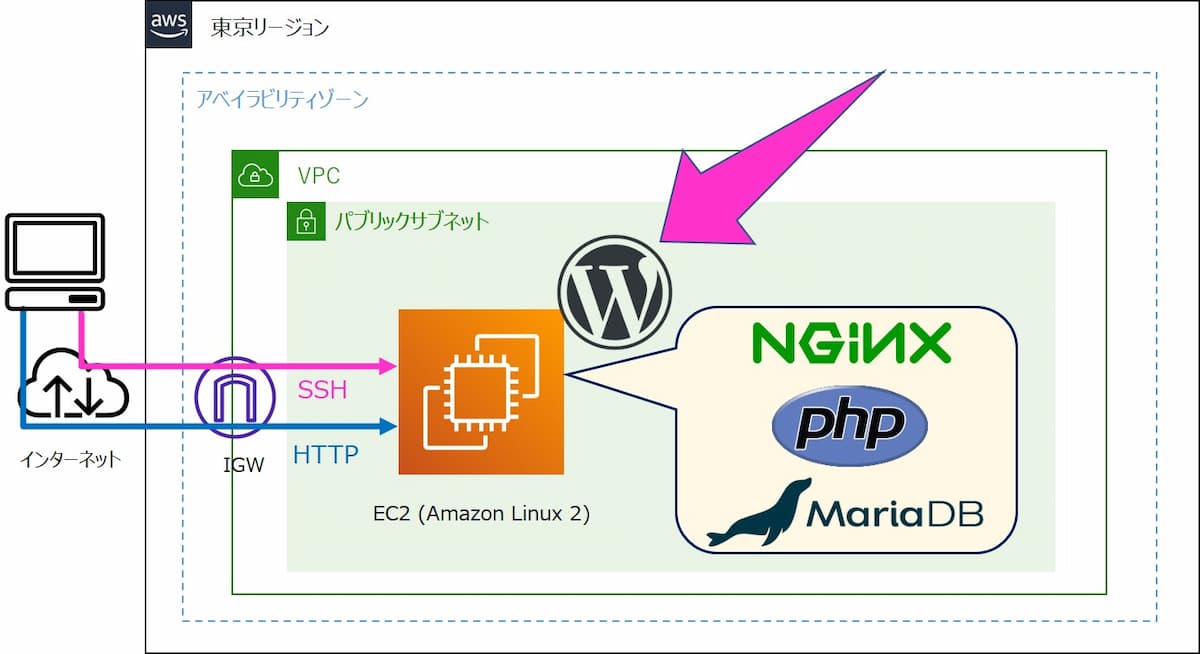
本記事ではAWSマネジメントコンソールとSSHクライアントを使用して、EC2 (Amazon Linux 2) にWordPressをインストールする手順をご紹介します。
ミドルウェアはNginx / PHP / MariaDBを使用します。
Nginxについて
Apacheより少しだけWordPressインストールにおける手順が増えますが、Nginxのほうが「処理が軽く同時アクセスに強い」といった利点があります。
ちなみに、有名なレンタルサーバー会社であるエックスサーバーも、WordPressのWebサーバーにNginxを採用しています。
EC2のWordPress構築における準備
WordPressをインストールするための準備を行います。
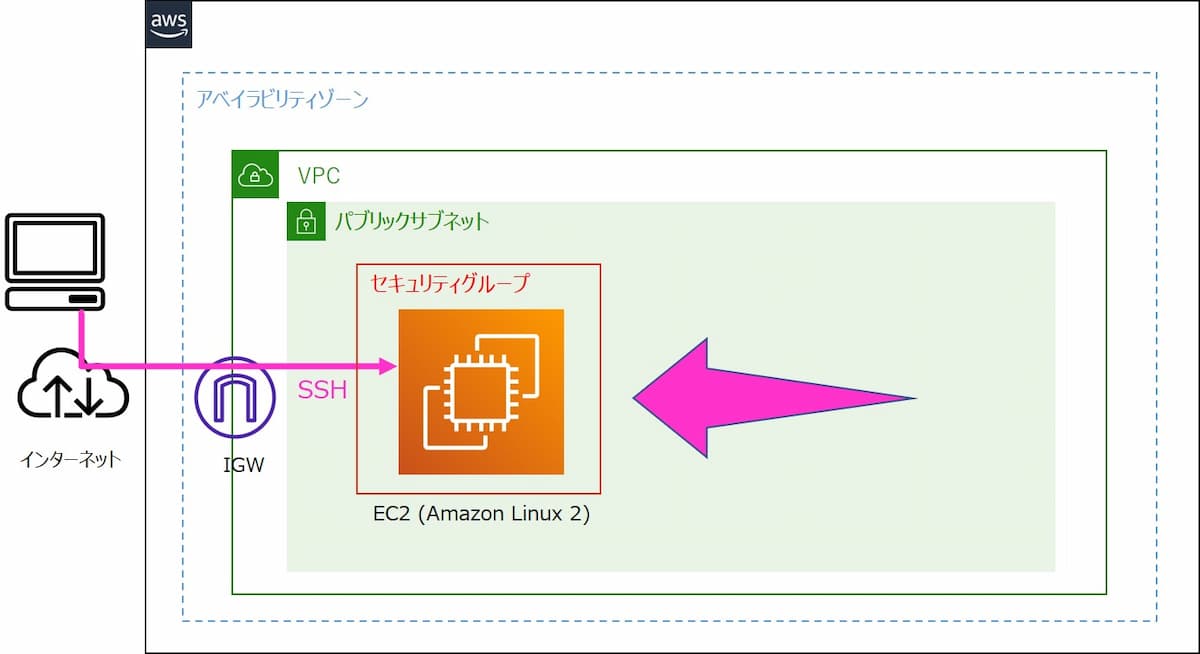
まずはEC2とセキュリティグループを作成します。
手順の説明のため、上図のみセキュリティグループを描いています。
EC2作成
EC2はAmazon Linux 2をt2.microで作成、パブリックサブネットに配置しパブリックIPアドレスを有効にします。
本記事では、AWSアカウント作成から12ヵ月間無料で使用できる [t2.micro] (1vCPU, メモリ1GiB) を使用してWordPressをインストールしています。
このインスタンスタイプでもWordPressのインストール自体は問題なく成功します。
もしEC2の作成方法が分からない場合は、以下記事を参考に構築します。
-

-
【AWS】EC2でAmazon Linux 2を構築しSSH接続してみよう
続きを見る
セキュリティグループの設定
EC2のセキュリティグループで、インバウンドルールに以下の2つを設定します。
- タイプ:SSH、ソース:マイIP
- タイプ:HTTP、ソース:マイIP
上記を設定後はSSHクライアントを使用して、EC2にSSH接続します。
ミドルウェアをインストール
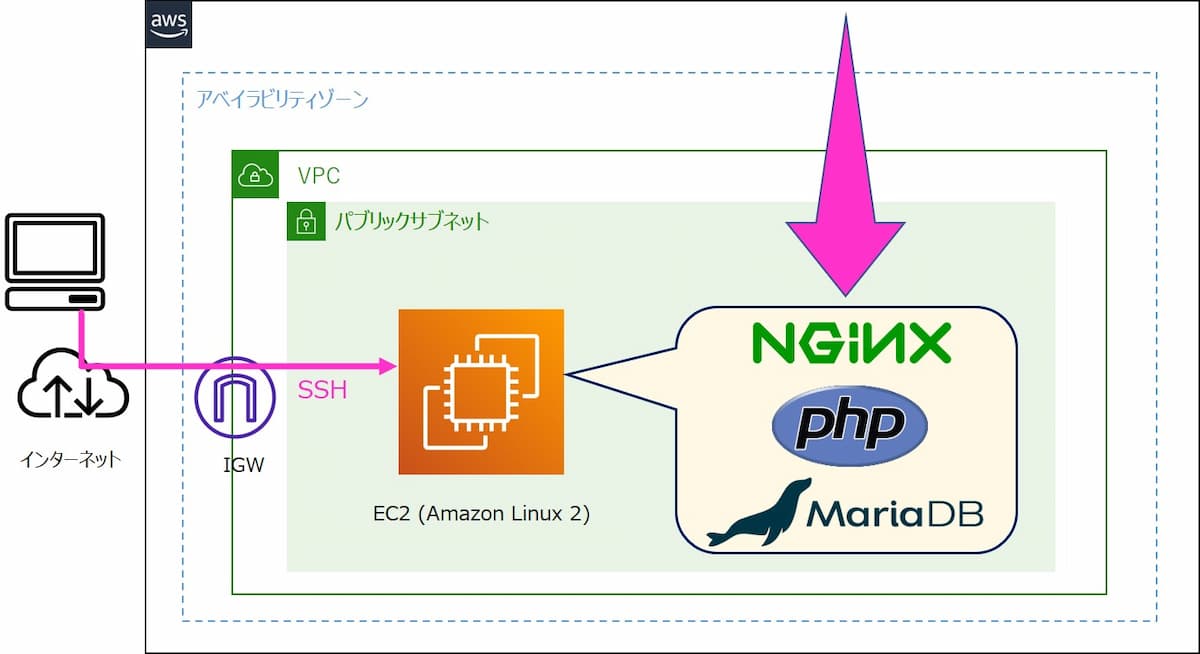
以下の順番でWordPressに必要なミドルウェアをインストールします。
- NginxとPHPインストール
- MariaDBインストール
- セキュアなパスワードを作成
- MariaDB設定
- Nginx設定
- PHP設定
- PHP-FPM設定
- OOM Killer対策:PHP-FPMチューニング
- NginxとPHP-FPMのサービス起動
- NginxとPHP-FPMのログ関連のオーナーとパーミッション変更
- PHP接続確認
- ミドルウェアのサービス自動起動設定
ステップが多いので、順番に解説しますね。
1. NginxとPHPインストール
最初に、OSにインストール済みのパッケージを全てupdateしておきます。(update後のOS再起動は不要とします)
$ sudo yum -y update
次にamazon-linux-extrasでNginxとPHP(ver8.2)をインストールします。
$ sudo amazon-linux-extras install -y nginx1 php8.2
インストール中に以下の通り「php-jsonを使用する場合は "sudo amazon-linux-extras install php8.1"を実行して」と表示されますが無視してください。
WordPressのインストールにおいて、php-jsonは必須パッケージではないためです。
php-json is available in Amazon Linux Extra topic "php8.1"
To use, run
# sudo amazon-linux-extras install php8.1
Learn more at
https://aws.amazon.com/amazon-linux-2/faqs/#Amazon_Linux_Extras
インストール後の確認。enabledとなっていればインストール完了です。
$ amazon-linux-extras | egrep 'nginx|php8.2'
 38  nginx1=latest            enabled      [ =stable ]
 68 †php8.2=latest            enabled      [ =stable ]
amazon-linux-extrasとは
- Amazon Linux 2で使用できる専用のリポジトリを操作するコマンド
- Amazonが公式サポートしたパッケージをインストールできる
- PHP、Pythonなど特定のパッケージは、ディストリビューションの標準パッケージより新しいバージョンで使用可能
【公式】Extras library (Amazon Linux 2)
続いて、PHP関連のパッケージを追加インストールします。
$ sudo yum install -y php-gd php-mbstring php-xml
PHP関連パッケージの用途
- php-gd : WordPressにおける画像処理
- php-mbstring : WordPressでマルチバイト文字(日本語)を処理
- php-xml : WordPressのバックアップデータ(.xml)を扱う際に使用
インストールされたことを確認します。
$ yum list installed | grep ^php- | sort
php-cli.x86_64                        8.2.9-1.amzn2                  @amzn2extra-php8.2
php-common.x86_64                     8.2.9-1.amzn2                  @amzn2extra-php8.2
php-fpm.x86_64                        8.2.9-1.amzn2                  @amzn2extra-php8.2
php-gd.x86_64                         8.2.9-1.amzn2                  @amzn2extra-php8.2
php-mbstring.x86_64                   8.2.9-1.amzn2                  @amzn2extra-php8.2
php-mysqlnd.x86_64                    8.2.9-1.amzn2                  @amzn2extra-php8.2
php-pdo.x86_64                        8.2.9-1.amzn2                  @amzn2extra-php8.2
php-xml.x86_64                        8.2.9-1.amzn2                  @amzn2extra-php8.2
2. MariaDBインストール
MariaDBをインストールします。
$ sudo yum install -y mariadb-server
インストールされたことを確認します。
$ yum list installed | grep mariadb-server
mariadb-server.x86_64 1:5.5.68-1.amzn2.0.1 @amzn2-core
3. セキュアなパスワードを作成
以下の用途で使用するパスワードを3つ作成します。これらはこの後の手順で使用します。
①MariaDB rootユーザー
②WordPress DBユーザー
③WordPress 管理画面ログイン用ユーザー
ノートンのパスワード作成サイトを使うと、簡単にパスワードを準備できます。
Norton Password Managerにアクセスし、「パスワードの長さ」を64文字にセット、「パスワードのコピー」をクリックしテキストエディタなどに貼り付けます。
続いて「更新ボタン」をクリックし、合計3つの異なるパスワードをメモします。
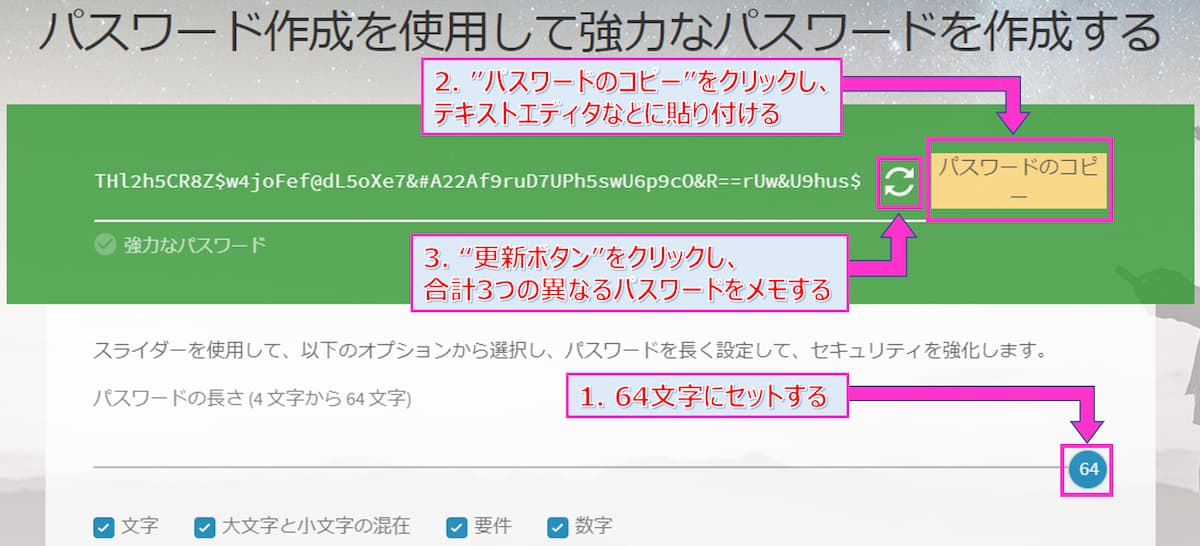
- 「ランダムパスワードを64文字」とする理由は、セキュリティをより強固にするため。
- もし文字列に ' (シングルクォーテーション)が含まれていた場合は別の文字に置き換えること。MariaDBでパスワードを入力する際、パスワードをシングルクォーテーションで囲む必要がある。しかし、パスワード自体にシングルクォーテーションが含まれると、その時点でパスワードの囲みが終了したと判定され、コマンドが正常に実行できないため。
4. MariaDB設定
次にMariaDBを起動します。
$ sudo systemctl start mariadb
$ ps -ef | grep -v grep | grep mariadb
mysql 1112 945 0 23:54 ? 00:00:00 /usr/libexec/mysqld --basedir=/usr --datadir=/var/lib/mysql --plugin-dir=/usr/lib64/mysql/plugin --log-error=/var/log/mariadb/mariadb.log --pid-file=/var/run/mariadb/mariadb.pid --socket=/var/lib/mysql/mysql.sock
mysql_secure_installationを実行し、セキュリティを強化しながらMatiaDBをインストールします。
$ sudo mysql_secure_installation

NOTE: RUNNING ALL PARTS OF THIS SCRIPT IS RECOMMENDED FOR ALL MariaDB
      SERVERS IN PRODUCTION USE!  PLEASE READ EACH STEP CAREFULLY!

In order to log into MariaDB to secure it, we'll need the current
password for the root user.  If you've just installed MariaDB, and
you haven't set the root password yet, the password will be blank,
so you should just press enter here.
以降は対話形式で入力していきます。
# 初期状態ではMariaDBのrootユーザーはパスワードを設定していないので、何も入力せずEnterキー押下
Enter current password for root (enter for none):
OK, successfully used password, moving on...

Setting the root password ensures that nobody can log into the MariaDB
root user without the proper authorisation.

# MariaDBのrootユーザーにおけるパスワードを設定するので、何も入力せずEnterキー押下
# 末尾に[Y/n]と表示されている対話は、何も入力せずEnterキー押下でYが選択されたことになる
Set root password? [Y/n]

# ノートンのパスワード作成サイトでメモした「①MariaDB root」のパスワードをコピペ
New password:

# 再度コピペ
Re-enter new password:
Password updated successfully!
Reloading privilege tables..
... Success!

By default, a MariaDB installation has an anonymous user, allowing anyone
to log into MariaDB without having to have a user account created for
them. This is intended only for testing, and to make the installation
go a bit smoother. You should remove them before moving into a
production environment.

# MariaDBの匿名ユーザーアカウントは削除するので、何も入力せずEnterキー押下
Remove anonymous users? [Y/n]
... Success!

Normally, root should only be allowed to connect from 'localhost'. This
ensures that someone cannot guess at the root password from the network.

# MariaDBのrootユーザーによるリモート接続は無効にするので、何も入力せずEnterキー押下
Disallow root login remotely? [Y/n]
... Success!

By default, MariaDB comes with a database named 'test' that anyone can
access. This is also intended only for testing, and should be removed
before moving into a production environment.

# テスト用のDBは削除するので、何も入力せずEnterキー押下
Remove test database and access to it? [Y/n]
- Dropping test database...
... Success!
- Removing privileges on test database...
... Success!

Reloading the privilege tables will ensure that all changes made so far
will take effect immediately.

# 権限テーブルを再読み込みするので、何も入力せずEnterキー押下
Reload privilege tables now? [Y/n]
... Success!

Cleaning up...

All done! If you've completed all of the above steps, your MariaDB
installation should now be secure.

Thanks for using MariaDB!
以下を実行してWorePress用のDBを作成します。
# MariaDBのDBにrootユーザーで接続
$ mysql -u root -p

# ノートンのパスワード作成サイトでメモした「①MariaDB rootユーザー」のパスワードをコピペ
Enter password:

# 今回は「wordpress-db」の名前でWordPress用のDBを作成
# もしDB名にハイフンが含まれる場合は ` (バッククォート)で囲む必要がある
MariaDB [(none)]> CREATE DATABASE `wordpress-db`;

Query OK, 1 row affected (0.00 sec)

# 作成したDBを確認
MariaDB [(none)]> show databases;

+--------------------+
| Database |
+--------------------+
| information_schema |
| mysql |
| performance_schema |
| wordpress-db |
+--------------------+
4 rows in set (0.00 sec)

# 今回は「wordpress-user」の名前でDB用のユーザー名を作成し、パスワードを設定
# ノートンのパスワード作成サイトでメモした「②WordPress DBユーザー」のパスワードを使用
# 「パスワード」は必ず ' (シングルクォーテーション) で囲むこと
MariaDB [(none)]> CREATE USER 'wordpress-user'@'localhost' IDENTIFIED BY 'パスワード';

Query OK, 0 rows affected (0.00 sec)

# 上記で作成したユーザーにWorePress用のDBに対する全権限を付与
MariaDB [(none)]> GRANT ALL PRIVILEGES ON `wordpress-db`.* TO "wordpress-user"@"localhost";

Query OK, 0 rows affected (0.00 sec)

# 上記で付与した権限をDBに反映
MariaDB [(none)]> FLUSH PRIVILEGES;

Query OK, 0 rows affected (0.00 sec)

# 作成したDB用ユーザーの確認
MariaDB [(none)]> SELECT Host, User FROM mysql.user;

+-----------+----------------+
| Host | User |
+-----------+----------------+
| 127.0.0.1 | root |
| ::1 | root |
| localhost | root |
| localhost | wordpress-user |
+-----------+----------------+
4 rows in set (0.00 sec)

# DBから切断
MariaDB [(none)]> exit
WordPressをインストールするだけであれば、以降で説明している手順の一部(設定ファイルの変更など)は必須ではありません。
しかし、テスト用のWordPressとしても、僕が最低限やっておいた方が良いと考える設定を、全て解説付きで紹介しています。
ぜひ、参考にしながら同じように設定してみてください。
5. Nginx設定
続いてNginxの設定ファイル/etc/nginx/nginx.confを修正します。
今回は、以下3つのパラメータを追加または修正します。
- client_max_body_size
- try_files
- error_page 404
client_max_body_sizeは、クライアントがリクエストするボディサイズの最大容量を指定するもので、デフォルトは1MBです。
デフォルトのままだと、WordPress管理画面からテーマをアップロードした時や、WordPressのプラグインを使用したバックアップ&リストア時に「413エラー」が発生する場合があります。
後述するPHPの設定でも、同様のパラメーターを修正しますが、今回はシンプルに100MBで統一させます。
try_filesは、WordPressのパーマリンクを変更できるようにするために設定します。
Nginxはこの設定がないと、パーマリンク変更後にWordPressサイトの記事にアクセスすると「404エラー」が発生してしまいます。
error_page 404は、存在しないURLにアクセスした際に画面に表示される「404エラー (Not Found)」を設定するパラメータです。
デフォルトのままだと、WordPressのテーマ毎に用意されている404.php(「404エラー (Not Found)」画面)を読み込めないので、あらかじめ修正しておきます。
# Nginxの設定ファイルをバックアップ
$ sudo cp -p /etc/nginx/nginx.conf /etc/nginx/nginx.conf_org

# Nginxの設定ファイルをvimで編集
$ sudo vim /etc/nginx/nginx.conf

# serverディレクティブ内を修正する
# 最初に、以下の20~24行目までを追記
# 次に、元々設定されている「error_page 404」から始まる3行を削除し、以下の26~34行目の内容に置き換える
*==========================*
    server {
        listen       80;
        listen       [::]:80;
        server_name  _;
        root         /usr/share/nginx/html;

        # Load configuration files for the default server block.
        include /etc/nginx/default.d/*.conf;

        client_max_body_size 100M;

        location / {
            try_files $uri $uri/ /index.php?$args;
        }

        error_page 404 = @notfound;
            location @notfound {
            include fastcgi_params;
            fastcgi_index index.php;
            fastcgi_param SERVER_NAME $host;
            fastcgi_param SCRIPT_FILENAME $document_root/index.php;
            fastcgi_param QUERY_STRING error=404;
            fastcgi_pass php-fpm;
        }

        error_page 500 502 503 504 /50x.html;
            location = /50x.html {
        }
    }
*==========================*

# vimdiffで修正箇所を確認
$ vimdiff /etc/nginx/nginx.conf_org /etc/nginx/nginx.conf

# nginx.confの構文チェックを行い、エラーがないことを確認しておく
$ sudo nginx -t
nginx: the configuration file /etc/nginx/nginx.conf syntax is ok
nginx: configuration file /etc/nginx/nginx.conf test is successful
6. PHP設定
次にPHPの設定ファイル/etc/php.iniを修正します。
今回は、以下2つのパラメータを変更します。
- post_max_size
- upload_max_filesize
post_max_sizeは、POST送信全体の最大データ容量を指定するもので、デフォルトは8MBです。
post_max_sizeは、1つのアップロードファイルにおける最大ファイル容量を指定するもので、デフォルトは2MBです。
上記2つのパラメーターがデフォルトのままだと、WordPress管理画面からテーマをアップロードした時や、WordPressのプラグインを使用したバックアップ&リストア時にエラーが発生する場合があります。
今回は分かりやすいように、1つ前の手順で設定したNginxのclient_max_body_sizeと同じ値の100MBに変更します。
# PHPの設定ファイルをバックアップ
$ sudo sudo cp -p /etc/php.ini /etc/php.ini_org

# "post_max_size" をデフォルトの8Mから100Mに増やす
# "M" は"MB(メガバイト)" を意味する
$ sudo sed -i "s/post_max_size.*/post_max_size = 100M/" /etc/php.ini

# "upload_max_filesize" をデフォルトの2Mから100Mに増やす
# "M" は"MB(メガバイト)" を意味する
$ sudo sed -i "s/upload_max_filesize.*/upload_max_filesize = 100M/" /etc/php.ini

# vimdiffで修正箇所を確認
$ vimdiff /etc/php.ini_org /etc/php.ini
memory_limitについて
php.ini にはデータサイズに関連する設定として "memory_limit" というパラメータもあります。
これは、PHPが利用可能なメモリの最大容量を指定するもので、デフォルトは128MBです。
本記事の構成の場合は、デフォルトのままで問題ないので修正はしません。
ちなみに、有名なレンタルサーバー会社であるエックスサーバーだと "memory_limit", "post_max_size", "upload_max_filesize" は全て同じ値の 1GB で定義されています。
(スタンダードプランの場合)
7. PHP-FPM設定
PHP-FPMの設定ファイル/etc/php-fpm.d/www.confを修正します。
デフォルトだとApache向けの設定になっているため、Nginxでも使用できるようにします。
# PHP-FPMの設定ファイルをバックアップ
$ sudo cp -p /etc/php-fpm.d/www.conf /etc/php-fpm.d/www.conf_org

# "user"と"group"の設定をapacheからnginxに置換
$ sudo sed -i -e "s/^user = apache/user = nginx/" -e "s/^group = apache/group = nginx/" /etc/php-fpm.d/www.conf

# PHP-FPMのUNIXソケットにおけるLISTEN設定を以下の通りに変更
# - listen.owner = nginx
# - listen.group = nginx
# - listen.mode = 0660
$ sudo sed -i -e "s/^;listen.owner.*/listen.owner = nginx/" -e "s/^;listen.group.*/listen.group = nginx/" -e "s/^;listen.mode/listen.mode/" /etc/php-fpm.d/www.conf

# "listen.acl_users"はACL (Access Control List: POSIX アクセス制御)の設定
# Linuxのパーミッション管理(オーナー・グループ・その他)の拡張版のような機能
# 今回は使用しないのでコメントアウトする
# sedで";&"と指定すると、左で指定した文字列を変更せずに先頭に";"を付与する
$ sudo sed -i "s/^listen.acl_users.*/;&/" /etc/php-fpm.d/www.conf

# vimdiffで修正箇所を確認
$ vimdiff /etc/php-fpm.d/www.conf_org /etc/php-fpm.d/www.conf
PHP-FPMとは
- PHP-FastCGI Process Managerの略。
- クライアントPCがサイトにアクセスすると、サーバーが動的にページを生成する。その動的ページをクライアントPCに返し、ユーザーはサイトを閲覧する。
- Webサーバー(本記事の構成だとNginx)とPHP-FPMが連携し、上記の動的ページ生成を行う。
8. OOM Killer対策:PHP-FPMチューニング
WordPressインストール後、サイトへの同時リクエスト数が増えると、それを処理するための複数のPHP-FPMの子プロセスがサーバーに自動生成されます。
PHP-FPMの子プロセス数が多くなると、その分だけOSのメモリがたくさん使われるという動きになります。
EC2を [t2.micro] (1vCPU, メモリ1GiB) で作成した場合、WordPressを使い続けていると上記理由でOSのメモリが不足するケースがあります。
このため、PHP-FPMの子プロセス数が多くなりすぎないように設定値をチューニングします。
# "pm.max_children" はPHP-FPMが作成する子プロセスの最大数
# 今回はデフォルトの "50" から "10" に減らす
sudo sed -i "s/^pm.max_children.*/pm.max_children = 10/"  /etc/php-fpm.d/www.conf

# "pm.max_spare_servers" はアイドル状態でプーリングしているPHP-FPMの子プロセス数の最大値
# この設定値よりも多くの子プロセスが立ち上がっていた場合、余剰分の子プロセスはアイドル時にkillされメモリが開放される
# 今回はデフォルトの "35" から "8" に減らす
sudo sed -i "s/^pm.max_spare_servers.*/pm.max_spare_servers = 8/"  /etc/php-fpm.d/www.conf

# vimdiffで修正箇所を確認
$ vimdiff /etc/php-fpm.d/www.conf_org /etc/php-fpm.d/www.conf
LinuxでOSの空きメモリ容量が不足すると、"OOM Killer" という処理により、メモリを多く使用しているプロセスが強制的にkillされます。
本記事のEC2構成だとMariaDBがkillされやすく、そうなるとWordPressサイトに接続できなくなります。
上記ではPHP-FPMの子プロセス数を少なくするチューニングで、PHP-FPMがOSのメモリを使いすぎないようにする方法を紹介しました。
もし、メモリ不足を根本的に解消する必要がある場合は、[t3.small] (2vCPU, メモリ2GiB) 以上へのスケールアップなどを検討してください。
9. NginxとPHP-FPMのサービス起動
NginxとPHP-FPMのサービスを起動します。
なお、PHP自体はサービスを起動するという概念はありません。
# Nginxを起動
$ sudo systemctl start nginx

# PHP-FPMを起動
$ sudo systemctl start php-fpm

# サービス起動後の確認("--sort cmd"オプションでプロセス名でソート)
$ ps -ef --sort cmd | grep -v grep | egrep 'nginx|php'
root       969     1  0 10:53 ?        00:00:00 nginx: master process /usr/sbin/nginx
nginx      974   969  0 10:53 ?        00:00:00 nginx: worker process
root       959     1  0 10:53 ?        00:00:00 php-fpm: master process (/etc/php-fpm.conf)
nginx      968   959  0 10:53 ?        00:00:00 php-fpm: pool www
nginx      970   959  0 10:53 ?        00:00:00 php-fpm: pool www
nginx      971   959  0 10:53 ?        00:00:00 php-fpm: pool www
nginx      972   959  0 10:53 ?        00:00:00 php-fpm: pool www
nginx      973   959  0 10:53 ?        00:00:00 php-fpm: pool www
もし、NginxサービスとPHP-FPMサービスの起動中に /etc/nginx/nginx.conf, /etc/php.ini, /etc/php-fpm.d/www.conf をいずれかを修正した場合は、設定を反映させるため必ず以下のサービス再起動を実行してください。
$ sudo systemctl restart nginx
$ sudo systemctl restart php-fpm
10. NginxとPHP-FPMのログ関連のオーナーとパーミッション変更
NginxとPHP-FPMのログディレクトリとログファイルに対し、オーナー(所有者)とパーミッション(権限)を明示的に設定します。
## Nginxログディレクトリのオーナーをnginxユーザーに、グループをrootグループに変更
$ sudo chown nginx:root /var/log/nginx/

## Nginxログディレクトリに以下の権限を設定
#   オーナー   : 読み取り、書き込み、実行
#   グループ   : 読み取り、書き込み、実行
#   他ユーザー: なし
$ sudo chmod 770 /var/log/nginx/

## Nginxのアクセスログとエラーログのオーナーをnginxユーザーに、グループをrootグループに変更
$ sudo chown nginx:root /var/log/nginx/access.log /var/log/nginx/error.log

## Nginxのアクセスログとエラーログに以下の権限を設定
#   オーナー   : 読み取り、書き込み
#   グループ   : 読み取り
#   他ユーザー: なし
$ sudo chmod 640 /var/log/nginx/access.log /var/log/nginx/error.log

## PHP-FPMログディレクトリのオーナーをnginxユーザーに、グループをrootグループに変更
$ sudo chown nginx:root /var/log/php-fpm/

## Nginxを再起動
$ sudo systemctl restart nginx

# PHP-FPMを再起動
$ sudo systemctl restart php-fpm
上記設定は実施しなくても、この後のWordPressインストールは成功します。
しかし、Nginxについては上記設定を行わないと、毎日OSが自動で行うログローテート後にNginxのログが出力されなくなるので、忘れずに実施しておきましょう。
11. PHP接続確認
NginxとPHPの連携が問題ないかを確認します。
まずindex2.phpをNginxのドキュメントルート(公開ディレクトリ)に作成します。
そのファイルのオーナーをnginxユーザーに、グループをnginxグループにそれぞれ変更します。
$ sudo sh -c "echo '<?php phpinfo(); ?>' > /usr/share/nginx/html/index2.php"
$ sudo chown nginx:nginx /usr/share/nginx/html/index2.php
次にWebブラウザから以下にアクセスします。
http://EC2のパブリック IPv4 DNS/index2.php
EC2の「パブリック IPv4 DNS」は、AWSマネジメントコンソールの対象EC2における「詳細」タブから確認できます。
せっかくなので、今回はEC2のメタデータから取得し、コピペしやすいように出力します。
## 対象EC2におけるIMDS(EC2インスタンスメタデータサービス)のバージョンにより取得方法が変わる

## IMDSv2の場合
# EC2メタデータ取得に必要なトークンを取得して「TOKEN」変数に代入
$ TOKEN=`curl -X PUT "http://169.254.169.254/latest/api/token" -H "X-aws-ec2-metadata-token-ttl-seconds: 21600" -s`

# メタデータからEC2の「パブリック IPv4 DNS」をURL形式で取得し、末尾に「/index2.php」を付与
$ curl -H "X-aws-ec2-metadata-token: $TOKEN" -s http://169.254.169.254/latest/meta-data/public-hostname | sed -e "1s/^/http:\/\//" -e "1s/$/\/index2.php/" | awk 1
http://ec2-xxx-xxx-xxx-xxx.ap-northeast-1.compute.amazonaws.com/index2.php

## IMDSv1の場合
# (トークンは不要)直接メタデータからEC2の「パブリック IPv4 DNS」をURL形式で取得し、末尾に「/index2.php」を付与
$ curl -s http://169.254.169.254/latest/meta-data/public-hostname | sed -e "1s/^/http:\/\//" -e "1s/$/\/index2.php/" | awk 1
http://ec2-xxx-xxx-xxx-xxx.ap-northeast-1.compute.amazonaws.com/index2.php
コマンドの補足
- curlの-sオプションで出力の進捗を非表示にする
- 「sed '1s/^/http:\/\//'」で先頭に「http://」を付与
- 「awk 1」で末尾に改行を付与
PHP情報ページが表示されれば、NginxとPHPの連携は成功です。

index2.phpはもう使用しないので削除します。
$ sudo rm /usr/share/nginx/html/index2.php
12. ミドルウェアのサービス自動起動設定
EC2を再起動したあとも、Nginx, PHP-FPM, MariaDBのサービスが自動起動するように設定します。
# 自動起動をenableに設定
$ sudo systemctl enable nginx php-fpm mariadb
Created symlink from /etc/systemd/system/multi-user.target.wants/nginx.service to /usr/lib/systemd/system/nginx.service.
Created symlink from /etc/systemd/system/multi-user.target.wants/php-fpm.service to /usr/lib/systemd/system/php-fpm.service.
Created symlink from /etc/systemd/system/multi-user.target.wants/mariadb.service to /usr/lib/systemd/system/mariadb.service.

# 3つのサービスが"enabled"になったことを確認
$ systemctl is-enabled nginx php-fpm mariadb
enabled
enabled
enabled
EC2にWordPressをインストール
最後に以下の順番でWordPressをインストールします。
- WordPressインストールパッケージをEC2に配置
- 認証用ユニークキーをメモ
- wp-config.php修正
- ドキュメントルート配下のオーナーとパーミッション変更
- WordPressインストール
- WordPress管理画面にログイン
- WordPressサイトにアクセス
1. WordPressインストールパッケージをEC2に配置
# WordPressのインストールパッケージを取得
$ cd /usr/local/src
$ sudo wget https://wordpress.org/latest.tar.gz

# WordPressのインストールパッケージを展開
$ sudo tar zxvf latest.tar.gz

# WordPressのインストールファイルをNginxドキュメントルートにコピー
$ sudo cp -pr wordpress/* /usr/share/nginx/html/

# 展開元のWordPressのインストールパッケージを削除
$ sudo rm latest.tar.gz

# コピー元のWordPressインストールファイルを削除
$ sudo rm -fr wordpress/
2. 認証用ユニークキーをメモ
WordPress Salts Generatorにアクセスし、認証用ユニークキー8行をそのまま全行テキストエディタにコピペします。

認証用ユニークキーとは
- WordPress管理画面のログイン情報など、ローカルPCに保存される「ブラウザのクッキー情報」を暗号する際に使用される
- 文字数が多く、ランダムな文字列を指定することで、WordPressサイトのセキュリティが向上する
3. wp-config.php修正
# "wp-config-sample.php"を"wp-config.php"というファイル名でコピー
$ cd /usr/share/nginx/html/
$ sudo cp -p wp-config-sample.php wp-config.php

# DB_NAMEの値を"wordpress-db"に置換
$ sudo sed -i "s/database_name_here/wordpress-db/" wp-config.php

# DB_USERの値を"wordpress-user"に置換
$ sudo sed -i "s/username_here/wordpress-user/" wp-config.php

# 変数"DBP"にノートンのパスワード作成サイトでメモした「②WordPress DBユーザー」のパスワードを代入する
# 「パスワード」は必ず ' (シングルクォーテーション) で囲む
$ DBP='WordPress DBユーザーのパスワード'

# 変数"DBP"に代入したパスワードに & (アンパサンド) が 含まれていると、この後実行するsedが意図した結果にならない
# この対処として & にエスケープ文字を追加する(パスワードに & が含まれていない場合も、以下を実行して良い)
$ DBP=$(echo ${DBP} | sed "s/&/\\\&/g")

# DB_PASSWORDの値を変数"DBP"に置換
$ sudo sed -i "s/password_here/${DBP}/" wp-config.php

# 以下の8行を行ごと削除し、認証用ユニークキーの8行をコピペする
$ sudo vim wp-config.php
*==========================*
define( 'AUTH_KEY',         'put your unique phrase here' );
define( 'SECURE_AUTH_KEY',  'put your unique phrase here' );
define( 'LOGGED_IN_KEY',    'put your unique phrase here' );
define( 'NONCE_KEY',        'put your unique phrase here' );
define( 'AUTH_SALT',        'put your unique phrase here' );
define( 'SECURE_AUTH_SALT', 'put your unique phrase here' );
define( 'LOGGED_IN_SALT',   'put your unique phrase here' );
define( 'NONCE_SALT',       'put your unique phrase here' );
*==========================*

# vimdiffで修正箇所を確認
$ vimdiff wp-config-sample.php wp-config.php
4. ドキュメントルート配下のオーナーとパーミッション変更
ドキュメントルート配下にあるファイルおよびディレクトリに対し、オーナー(所有者)とパーミッション(権限)を明示的に設定します。
これは、WordPressの正常稼働と、WordPressサイトのセキュリティ強化のために行います。
## ドキュメントルート配下の全ファイル/全ディレクトリのオーナーをnginxユーザーに、グループをnginxグループに変更
$ sudo chown -R nginx:nginx /usr/share/nginx/html/

## ドキュメントルート自体を含む、配下の全ディレクトリに以下の権限を設定
#   オーナー   : 読み取り、書き込み、実行
#   グループ   : 読み取り、書き込み、実行
#   他ユーザー: 読み取り、実行
$ sudo find /usr/share/nginx/html/ -type d -exec chmod 775 {} \;

## ドキュメントルート配下の全ファイルに以下の権限を設定
#   オーナー   : 読み取り、書き込み、実行
#   グループ   : 読み取り
#   他ユーザー: 読み取り
$ sudo find /usr/share/nginx/html/ -type f -exec chmod 644 {} \;

## [wp-config.php] ファイルはnginxユーザーのみ読み取れるように以下の権限を設定
## DB接続情報や認証用ユニークキーが記述されているため、こうすることでセキュリティを強化できる
#   オーナー   : 読み取り、書き込み
#   グループ   : なし
#   他ユーザー: なし
$ sudo chmod 600 /usr/share/nginx/html/wp-config.php
5. WordPressインストール
Webブラウザから以下にアクセスします。
http://EC2のパブリック IPv4 DNS/wp-config.php
先程のPHP接続確認と同じように、上記URLはEC2のメタデータから取得します。
## 対象EC2におけるIMDS(EC2インスタンスメタデータサービス)のバージョンにより取得方法が変わる

## IMDSv2の場合
# EC2メタデータ取得に必要なトークンを取得して「TOKEN」変数に代入
$ TOKEN=`curl -X PUT "http://169.254.169.254/latest/api/token" -H "X-aws-ec2-metadata-token-ttl-seconds: 21600" -s`

# メタデータからEC2の「パブリック IPv4 DNS」をURL形式で取得し、末尾に「/wp-config.php」を付与
$ curl -H "X-aws-ec2-metadata-token: $TOKEN" -s http://169.254.169.254/latest/meta-data/public-hostname | sed -e "1s/^/http:\/\//" -e "1s/$/\/wp-config.php/" | awk 1
http://ec2-xxx-xxx-xxx-xxx.ap-northeast-1.compute.amazonaws.com/wp-config.php

## IMDSv1の場合
# (トークンは不要)メタデータからEC2の「パブリック IPv4 DNS」をURL形式で取得し、末尾に「/wp-config.php」を付与
$ curl -s http://169.254.169.254/latest/meta-data/public-hostname | sed -e "1s/^/http:\/\//" -e "1s/$/\/wp-config.php/" | awk 1
http://ec2-xxx-xxx-xxx-xxx.ap-northeast-1.compute.amazonaws.com/wp-config.php
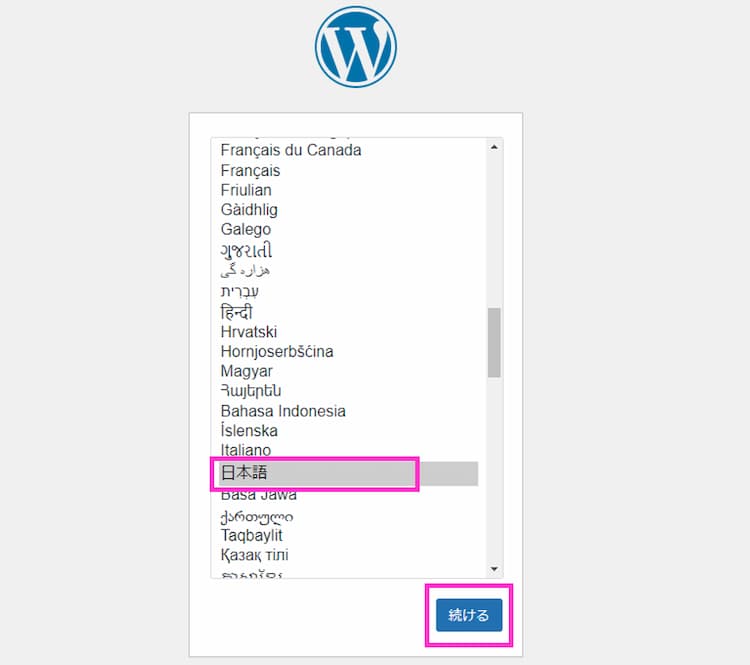
はじめに言語を設定します。
真ん中くらいまでスクロールし「日本語」を選択、「続ける」をクリックします。
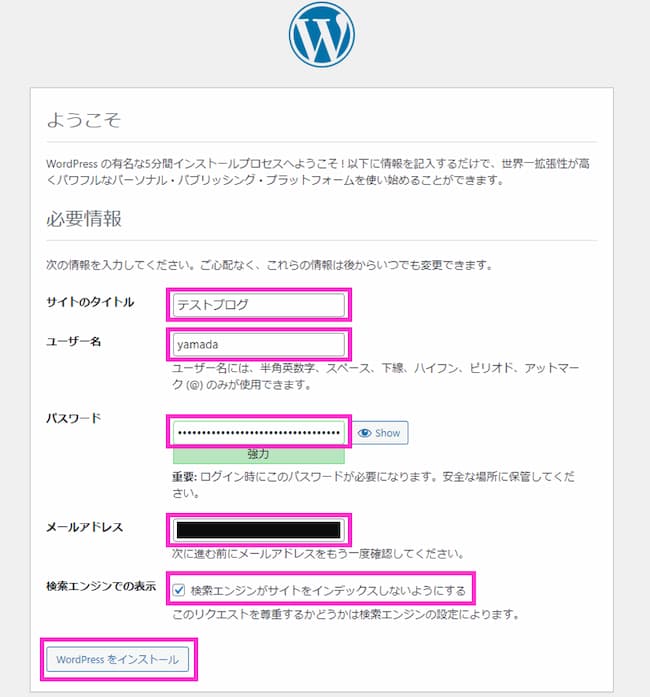
続けて以下の情報を入力し、「WordPressをインストール」をクリックします。
- サイトのタイトル:WordPressのサイト名
- ユーザー名:WordPress 管理画面ログイン用のユーザー名
- パスワード:ノートンのパスワード作成サイトでメモした「③WordPress 管理画面ログイン用ユーザー」のパスワードをコピペ
- メールアドレス:自分の受信可能なメールアドレス
- 検索エンジンでの表示:テスト用のサイトなので
以下の画面が表示されれば、インストールは無事成功です。
続けて「ログイン」をクリックすると、WordPress管理画面に移動します。

6. WordPress管理画面にログイン
ユーザー名とパスワードを入力し、「ログイン」をクリックします。
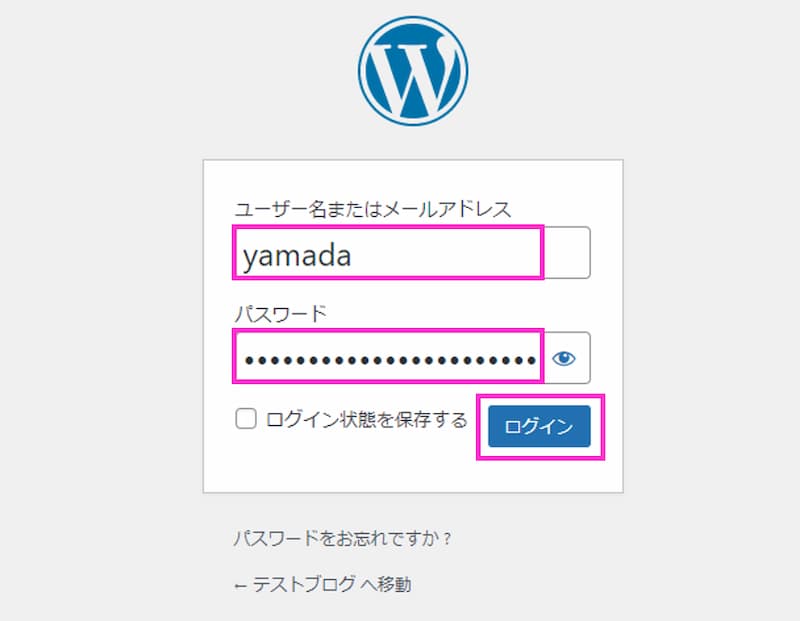
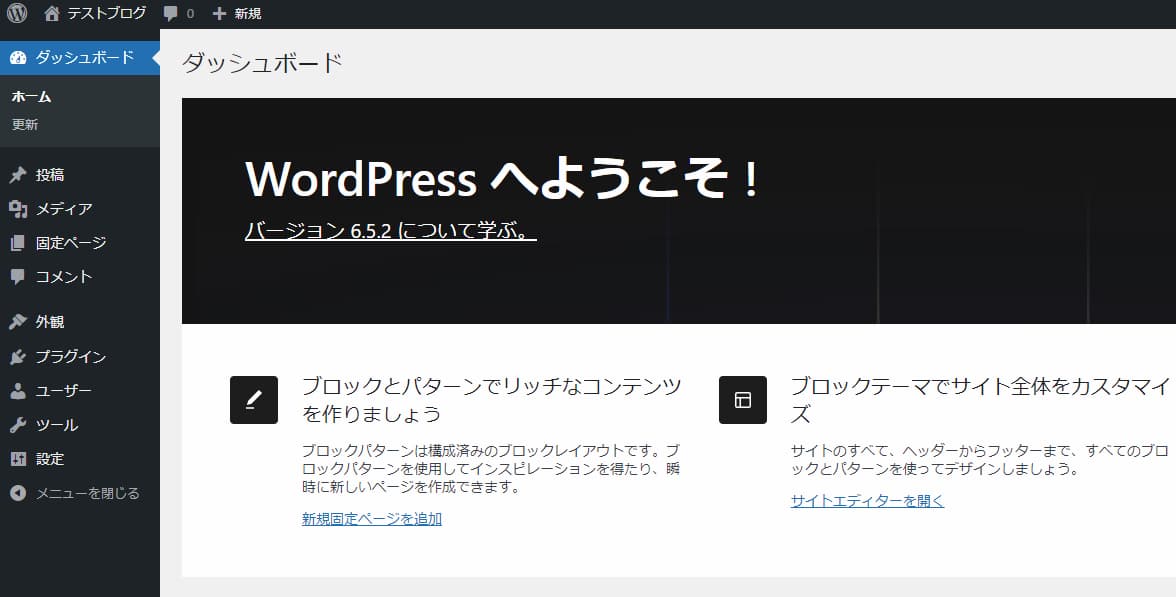
管理画面にログインできました。
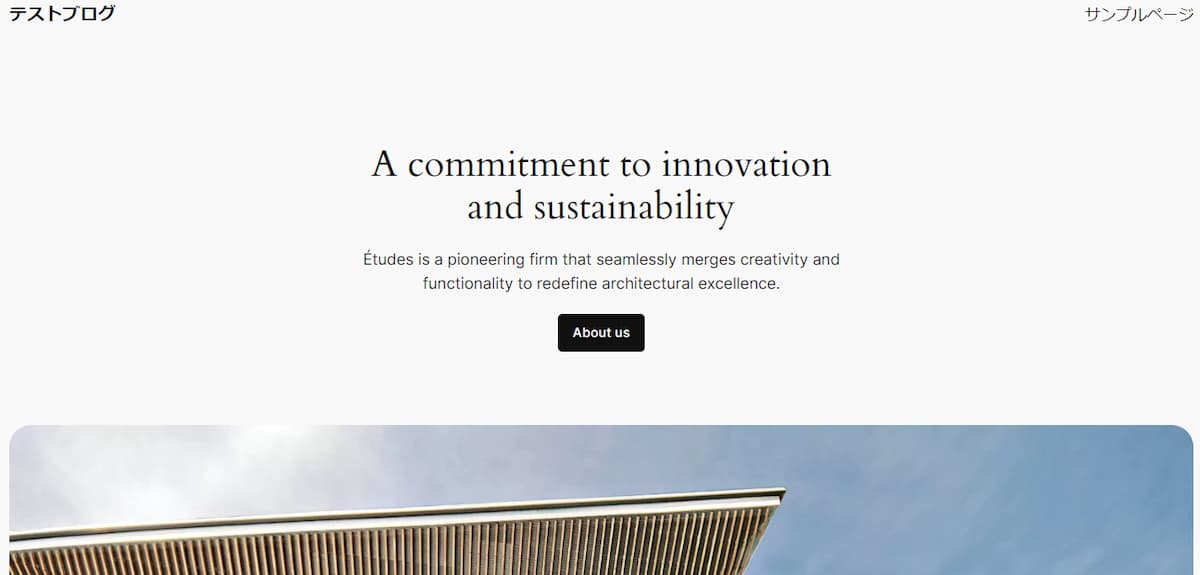
7. WordPressサイトにアクセス
Webブラウザから以下にアクセスします。
http://EC2のパブリック IPv4 DNS
今回も上記URLはEC2のメタデータから取得します。
## IMDSv2の場合
# EC2メタデータ取得に必要なトークンを取得して「TOKEN」変数に代入
$ TOKEN=`curl -X PUT "http://169.254.169.254/latest/api/token" -H "X-aws-ec2-metadata-token-ttl-seconds: 21600" -s`

# メタデータからEC2の「パブリック IPv4 DNS」をURL形式で取得
$ curl -H "X-aws-ec2-metadata-token: $TOKEN" -s http://169.254.169.254/latest/meta-data/public-hostname | sed '1s/^/http:\/\//' | awk 1
http://ec2-xxx-xxx-xxx-xxx.ap-northeast-1.compute.amazonaws.com

## IMDSv1の場合
#  (トークンは不要)メタデータからEC2の「パブリック IPv4 DNS」をURL形式で取得
$ curl -s http://169.254.169.254/latest/meta-data/public-hostname | sed '1s/^/http:\/\//' | awk 1
http://ec2-xxx-xxx-xxx-xxx.ap-northeast-1.compute.amazonaws.com
無事にサイトへアクセスできました。
WordPressの管理画面とサイトに正常にアクセスできた後は、wp-config-sample.phpは不要になるため削除しておきましょう。
$ cd /usr/share/nginx/html/
$ sudo rm wp-config-sample.php
EC2のWordPressインストールは簡単:まとめ
EC2にWordPressをインストールする手順を紹介しました。EC2単体だと簡単ですね。
なお、本格的にEC2でWordPressを運用する場合は、以下などを考慮する必要があります。
- WordPressサイトのサービス監視
- DBはRDSで稼働させる
- Route 53で独自ドメインを設定
- EC2の前段にELBを配置してSSL化
- ELBにACM(AWSのSSL/TLS証明書サービス)を設定
- EC2やRDSで可用性を確保
- WordPressを静的サイト化してCloudFrontとS3で配信
- WAFでセキュリティを強化
- NginxとPHPの設定ファイル見直し(セキュリティやパフォーマンスチューニングなど)
AWSの勉強のために、上記のいずれかもしくは複数を実装したWordPressを運用してみるのも面白そうですね。
最後に、作成したEC2が不要な場合は忘れずに削除しましょう。(コストやセキュリティ観点で)
当記事が参考になれば幸いです。